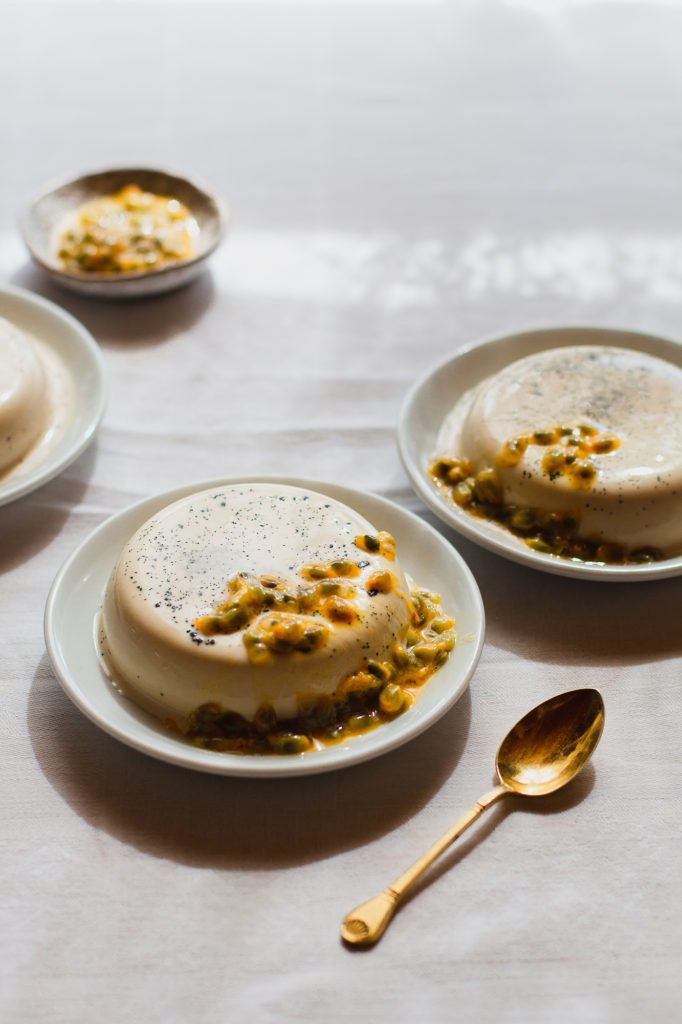
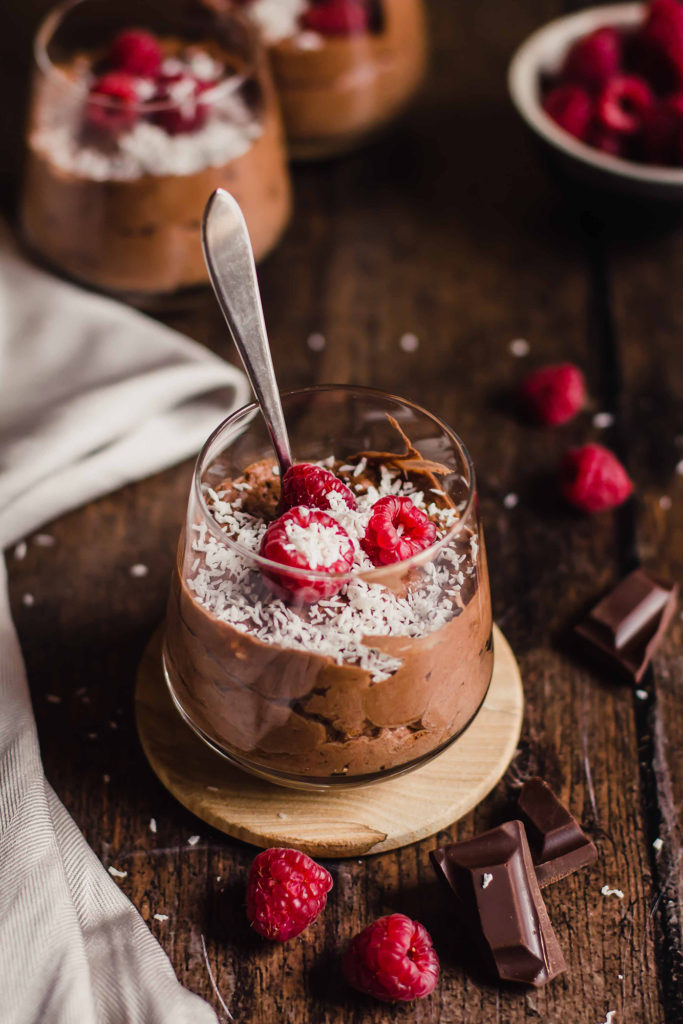
Light and airy food photography is a style that is very popular among food bloggers and food business owners to showcase delicious recipes and quality products. In this post, you'll learn about some tools you use to create this style as well as some specific photography techniques to enhance the bright look and feel of an image.
What is light and airy food photography? Light and airy food photos are ones that are generally use bright but soft light and emanate a joyful yet calming vibe.
In contrast to dark and moody photography , the light and airy style has a much softer feel to it, where the contrast between light and dark is more subtle (though not completely absent).
It's a popular choice for food photos among bloggers because the dishes look fresh, vibrant and appetising to the viewer.
Businesses in the food industry also often like this style of photography for their marketing content for a similar reason - their products look inviting and evoke (hopefully) positive and happy emotions in their audience.
I personally also like this style of photography and can definitely notice myself gravitating towards brighter scenes in the spring and summer months!
Helpful tools for creating a light photography style There are some basic tools and equipment that you can use to help create beautiful bright food photos.
If you tend to shoot with natural light and it's a gorgeous sunny day, you might not need to use some of these items. However, you can't control how much light you'll get on any given day and if you live in a country like the U.K. when the days are dark and short in winter, then you'll probably want these tools in your studio to make sure you can still capture this style of image.
Let's take a look at each tool and how they can help you create light and airy food photography!
Tripod A tripod is a very important piece of kit, in my opinion. This is because it will keep your camera perfectly stable , meaning that you can have complete control over the camera settings and ensure all your shots are sharp and in focus .
<img data-lazy-fallback="1" class="tve_image wp-image-4343 tcb-moved-image" alt="" data-id="4343" width="636" data-init-width="768" height="848" data-init-height="1024" title="natural-light-food-photography" loading="lazy" src="https://lindahermansphotography.com/wp-content/uploads/2021/11/natural-light-food-photography.jpeg" data-width="636" data-height="848" data-css="tve-u-182a7850c33" srcset="https://i0.wp.com/lindahermansphotography.com/wp-content/uploads/2021/11/natural-light-food-photography.jpeg?w=768&ssl=1 768w, https://i0.wp.com/lindahermansphotography.com/wp-content/uploads/2021/11/natural-light-food-photography.jpeg?resize=225%2C300&ssl=1 225w, https://i0.wp.com/lindahermansphotography.com/wp-content/uploads/2021/11/natural-light-food-photography.jpeg?resize=750%2C1000&ssl=1 750w" sizes="(max-width: 636px) 100vw, 636px" /> A tripod will keep your camera stable, giving you more control over your camera settings and composition. My tripod is a Vanguard Alta Pro .
Using a tripod and thus having more control over your camera settings will help when you need to capture bright photos on dark days because it means you can shoot with longer shutter speeds . Longer shutter speeds allow more light to enter the camera, brightening your image without compromising on quality . It also means you can choose the aperture you want, again without compromising on other technical settings.
Not sure how to use all the settings on your camera? Check out this post to help you master manual mode!
Plus, mounting your camera on a tripod means that you can concentrate more on your composition and styling since it will remain in the same position whilst you position all the elements in the frame.
Diffuser Diffusers are very common tools for many photographers. They're used to soften the light and decrease the contrast and shadows in a scene.
If you're shooting on a really sunny day and the sun beams are streaming into your studio and creating unwanted hard light on your scene, placing a diffuser in front of the window will help to soften that light .
<img data-lazy-fallback="1" class="tve_image wp-image-4780 tcb-moved-image" alt="" data-id="4780" width="479" data-init-width="1210" height="498" data-init-height="1258" title="Screenshot-2022-03-09-at-09.40.38" loading="lazy" src="https://lindahermansphotography.com/wp-content/uploads/2022/03/Screenshot-2022-03-09-at-09.40.38.png" data-width="479" data-height="498" data-css="tve-u-182a78671f7" srcset="https://i0.wp.com/lindahermansphotography.com/wp-content/uploads/2022/03/Screenshot-2022-03-09-at-09.40.38.png?w=1210&ssl=1 1210w, https://i0.wp.com/lindahermansphotography.com/wp-content/uploads/2022/03/Screenshot-2022-03-09-at-09.40.38.png?resize=289%2C300&ssl=1 289w, https://i0.wp.com/lindahermansphotography.com/wp-content/uploads/2022/03/Screenshot-2022-03-09-at-09.40.38.png?resize=985%2C1024&ssl=1 985w, https://i0.wp.com/lindahermansphotography.com/wp-content/uploads/2022/03/Screenshot-2022-03-09-at-09.40.38.png?resize=768%2C798&ssl=1 768w, https://i0.wp.com/lindahermansphotography.com/wp-content/uploads/2022/03/Screenshot-2022-03-09-at-09.40.38.png?resize=750%2C780&ssl=1 750w" sizes="(max-width: 479px) 100vw, 479px" /> Example of a photography diffuser. This is the one I use and I bought it from Amazon.com
Of course, you might want hard light for a bright image but a "light and airy" style photo is usually captured with soft light and shadows.
You don't need a professional diffuser to soften light - a white or neutral coloured sheer fabric hung in front of the window will have the same effect!
Bounce board Bounce boards are another cheap and simple tool that can be really helpful for creating light images.
Learn more about shaping and manipulating natural light
Bounce boards are used to bounce and reflect light back into a scene. By placing a white bounce board opposite your light source and next to the area you want to brighten, you will reflect the light straight back into that area and immediately see that the shadows become lighter and there is less contrast. You can see this in the example images below.
<img data-lazy-fallback="1" class="tve_image wp-image-4783" alt="" data-id="4783" width="1707" height="2560" title="Bright-airy-without-fill-light" src="https://lindahermansphotography.com/wp-content/uploads/2022/03/Bright-airy-without-fill-light-683x1024.jpg" data-src="https://lindahermansphotography.com/wp-content/uploads/2022/03/Bright-airy-without-fill-light-683x1024.jpg" loading="lazy" data-sizes="{"thumbnail":{"height":150,"width":150,"url":"https://lindahermansphotography.com/wp-content/uploads/2022/03/Bright-airy-without-fill-light-150x150.jpg","orientation":"landscape"},"medium":{"height":300,"width":200,"url":"https://lindahermansphotography.com/wp-content/uploads/2022/03/Bright-airy-without-fill-light-200x300.jpg","orientation":"portrait"},"large":{"height":1024,"width":683,"url":"https://lindahermansphotography.com/wp-content/uploads/2022/03/Bright-airy-without-fill-light-683x1024.jpg","orientation":"portrait"},"full":{"url":"https://lindahermansphotography.com/wp-content/uploads/2022/03/Bright-airy-without-fill-light-scaled.jpg","height":2560,"width":1707,"orientation":"portrait"}}" srcset="https://i0.wp.com/lindahermansphotography.com/wp-content/uploads/2022/03/Bright-airy-without-fill-light-scaled.jpg?resize=683%2C1024&ssl=1 683w, https://i0.wp.com/lindahermansphotography.com/wp-content/uploads/2022/03/Bright-airy-without-fill-light-scaled.jpg?resize=200%2C300&ssl=1 200w, https://i0.wp.com/lindahermansphotography.com/wp-content/uploads/2022/03/Bright-airy-without-fill-light-scaled.jpg?resize=768%2C1152&ssl=1 768w, https://i0.wp.com/lindahermansphotography.com/wp-content/uploads/2022/03/Bright-airy-without-fill-light-scaled.jpg?resize=1024%2C1536&ssl=1 1024w, https://i0.wp.com/lindahermansphotography.com/wp-content/uploads/2022/03/Bright-airy-without-fill-light-scaled.jpg?resize=1365%2C2048&ssl=1 1365w, https://i0.wp.com/lindahermansphotography.com/wp-content/uploads/2022/03/Bright-airy-without-fill-light-scaled.jpg?resize=750%2C1125&ssl=1 750w, https://i0.wp.com/lindahermansphotography.com/wp-content/uploads/2022/03/Bright-airy-without-fill-light-scaled.jpg?resize=360%2C540&ssl=1 360w, https://i0.wp.com/lindahermansphotography.com/wp-content/uploads/2022/03/Bright-airy-without-fill-light-scaled.jpg?w=1707&ssl=1 1707w" sizes="(max-width: 1707px) 100vw, 1707px" />
<img data-lazy-fallback="1" class="tve_image wp-image-4784" alt="" data-id="4784" width="1707" height="2560" title="Bright-airy-with-fill-light" src="https://lindahermansphotography.com/wp-content/uploads/2022/03/Bright-airy-with-fill-light-683x1024.jpg" data-src="https://lindahermansphotography.com/wp-content/uploads/2022/03/Bright-airy-with-fill-light-683x1024.jpg" loading="lazy" data-sizes="{"thumbnail":{"height":150,"width":150,"url":"https://lindahermansphotography.com/wp-content/uploads/2022/03/Bright-airy-with-fill-light-150x150.jpg","orientation":"landscape"},"medium":{"height":300,"width":200,"url":"https://lindahermansphotography.com/wp-content/uploads/2022/03/Bright-airy-with-fill-light-200x300.jpg","orientation":"portrait"},"large":{"height":1024,"width":683,"url":"https://lindahermansphotography.com/wp-content/uploads/2022/03/Bright-airy-with-fill-light-683x1024.jpg","orientation":"portrait"},"full":{"url":"https://lindahermansphotography.com/wp-content/uploads/2022/03/Bright-airy-with-fill-light-scaled.jpg","height":2560,"width":1707,"orientation":"portrait"}}" srcset="https://i0.wp.com/lindahermansphotography.com/wp-content/uploads/2022/03/Bright-airy-with-fill-light-scaled.jpg?resize=683%2C1024&ssl=1 683w, https://i0.wp.com/lindahermansphotography.com/wp-content/uploads/2022/03/Bright-airy-with-fill-light-scaled.jpg?resize=200%2C300&ssl=1 200w, https://i0.wp.com/lindahermansphotography.com/wp-content/uploads/2022/03/Bright-airy-with-fill-light-scaled.jpg?resize=768%2C1152&ssl=1 768w, https://i0.wp.com/lindahermansphotography.com/wp-content/uploads/2022/03/Bright-airy-with-fill-light-scaled.jpg?resize=1024%2C1536&ssl=1 1024w, https://i0.wp.com/lindahermansphotography.com/wp-content/uploads/2022/03/Bright-airy-with-fill-light-scaled.jpg?resize=1365%2C2048&ssl=1 1365w, https://i0.wp.com/lindahermansphotography.com/wp-content/uploads/2022/03/Bright-airy-with-fill-light-scaled.jpg?resize=750%2C1125&ssl=1 750w, https://i0.wp.com/lindahermansphotography.com/wp-content/uploads/2022/03/Bright-airy-with-fill-light-scaled.jpg?resize=360%2C540&ssl=1 360w, https://i0.wp.com/lindahermansphotography.com/wp-content/uploads/2022/03/Bright-airy-with-fill-light-scaled.jpg?w=1707&ssl=1 1707w" sizes="(max-width: 1707px) 100vw, 1707px" />
Be careful not to completely eliminate the shadows from your photos or they will become rather dull and lifeless!
Join our mailing list Sign up to receive free food photography tips, exclusive resources and 10% off in the online store!
Light coloured backdrop and props Your choice of backdrops and props are integral to the overall feeling and the story you want to tell in your image.
Bright photos tend to work best when you use neutral or lighter coloured surfaces and backdrops to place your subject and supporting props on. When choosing backdrops, I love for them to have some kind of texture to them to add interest to the scene, without distracting from the main subject.
Similarly, props that are neutral or light in colour will work best for this photography style. Hand made pottery and ceramics often come in gorgeous, earthy colours and have lovely speckled textures that are really great for adding some character to food photography.
In the images below you can see some of the backdrops and props I use for light and airy style food photos. Notice how they add interest to the scene, yet are cohesive rather than distracting.
<img data-lazy-fallback="1" class="tve_image wp-image-5493" alt="" data-id="5493" width="1333" height="2000" title="Linda Hermans Photography-Food Photography-Quiche" src="https://lindahermansphotography.com/wp-content/uploads/2022/07/Linda-Hermans-Photography-Food-Photography-Quiche-200x300.jpg" data-src="https://lindahermansphotography.com/wp-content/uploads/2022/07/Linda-Hermans-Photography-Food-Photography-Quiche-682x1024.jpg" loading="lazy" data-sizes="{"thumbnail":{"height":150,"width":150,"url":"https://lindahermansphotography.com/wp-content/uploads/2022/07/Linda-Hermans-Photography-Food-Photography-Quiche-150x150.jpg","orientation":"landscape"},"medium":{"height":300,"width":200,"url":"https://lindahermansphotography.com/wp-content/uploads/2022/07/Linda-Hermans-Photography-Food-Photography-Quiche-200x300.jpg","orientation":"portrait"},"large":{"height":1024,"width":682,"url":"https://lindahermansphotography.com/wp-content/uploads/2022/07/Linda-Hermans-Photography-Food-Photography-Quiche-682x1024.jpg","orientation":"portrait"},"full":{"url":"https://lindahermansphotography.com/wp-content/uploads/2022/07/Linda-Hermans-Photography-Food-Photography-Quiche.jpg","height":2000,"width":1333,"orientation":"portrait"}}" data-css="tve-u-182a78d9f5e" srcset="https://i0.wp.com/lindahermansphotography.com/wp-content/uploads/2022/07/Linda-Hermans-Photography-Food-Photography-Quiche.jpg?resize=200%2C300&ssl=1 200w, https://i0.wp.com/lindahermansphotography.com/wp-content/uploads/2022/07/Linda-Hermans-Photography-Food-Photography-Quiche.jpg?resize=682%2C1024&ssl=1 682w, https://i0.wp.com/lindahermansphotography.com/wp-content/uploads/2022/07/Linda-Hermans-Photography-Food-Photography-Quiche.jpg?resize=768%2C1152&ssl=1 768w, https://i0.wp.com/lindahermansphotography.com/wp-content/uploads/2022/07/Linda-Hermans-Photography-Food-Photography-Quiche.jpg?resize=1024%2C1536&ssl=1 1024w, https://i0.wp.com/lindahermansphotography.com/wp-content/uploads/2022/07/Linda-Hermans-Photography-Food-Photography-Quiche.jpg?w=1333&ssl=1 1333w" sizes="(max-width: 1333px) 100vw, 1333px" />
<img data-lazy-fallback="1" class="tve_image wp-image-4790" alt="" data-id="4790" width="1707" height="2560" title="Linda Hermans Photography-Carrots Produce-3" src="https://lindahermansphotography.com/wp-content/uploads/2022/03/Linda-Hermans-Photography-Carrots-Produce-3-200x300.jpg" data-src="https://lindahermansphotography.com/wp-content/uploads/2022/03/Linda-Hermans-Photography-Carrots-Produce-3-683x1024.jpg" loading="lazy" data-sizes="{"thumbnail":{"height":150,"width":150,"url":"https://lindahermansphotography.com/wp-content/uploads/2022/03/Linda-Hermans-Photography-Carrots-Produce-3-150x150.jpg","orientation":"landscape"},"medium":{"height":300,"width":200,"url":"https://lindahermansphotography.com/wp-content/uploads/2022/03/Linda-Hermans-Photography-Carrots-Produce-3-200x300.jpg","orientation":"portrait"},"large":{"height":1024,"width":683,"url":"https://lindahermansphotography.com/wp-content/uploads/2022/03/Linda-Hermans-Photography-Carrots-Produce-3-683x1024.jpg","orientation":"portrait"},"full":{"url":"https://lindahermansphotography.com/wp-content/uploads/2022/03/Linda-Hermans-Photography-Carrots-Produce-3-scaled.jpg","height":2560,"width":1707,"orientation":"portrait"}}" data-css="tve-u-182a78d9f63" srcset="https://i0.wp.com/lindahermansphotography.com/wp-content/uploads/2022/03/Linda-Hermans-Photography-Carrots-Produce-3-scaled.jpg?resize=200%2C300&ssl=1 200w, https://i0.wp.com/lindahermansphotography.com/wp-content/uploads/2022/03/Linda-Hermans-Photography-Carrots-Produce-3-scaled.jpg?resize=683%2C1024&ssl=1 683w, https://i0.wp.com/lindahermansphotography.com/wp-content/uploads/2022/03/Linda-Hermans-Photography-Carrots-Produce-3-scaled.jpg?resize=768%2C1152&ssl=1 768w, https://i0.wp.com/lindahermansphotography.com/wp-content/uploads/2022/03/Linda-Hermans-Photography-Carrots-Produce-3-scaled.jpg?resize=1024%2C1536&ssl=1 1024w, https://i0.wp.com/lindahermansphotography.com/wp-content/uploads/2022/03/Linda-Hermans-Photography-Carrots-Produce-3-scaled.jpg?resize=1365%2C2048&ssl=1 1365w, https://i0.wp.com/lindahermansphotography.com/wp-content/uploads/2022/03/Linda-Hermans-Photography-Carrots-Produce-3-scaled.jpg?resize=750%2C1125&ssl=1 750w, https://i0.wp.com/lindahermansphotography.com/wp-content/uploads/2022/03/Linda-Hermans-Photography-Carrots-Produce-3-scaled.jpg?resize=360%2C540&ssl=1 360w, https://i0.wp.com/lindahermansphotography.com/wp-content/uploads/2022/03/Linda-Hermans-Photography-Carrots-Produce-3-scaled.jpg?w=1707&ssl=1 1707w" sizes="(max-width: 1707px) 100vw, 1707px" />
<img data-lazy-fallback="1" class="tve_image wp-image-5317" alt="passion frui panna cotta food photography" data-id="5317" width="1333" height="2000" title="Passionfruit panna cotta" src="https://lindahermansphotography.com/wp-content/uploads/2022/07/Linda-Hermans-Photography-Passion-fruit-panna-cotta_backlight-200x300.jpg" data-src="https://lindahermansphotography.com/wp-content/uploads/2022/07/Linda-Hermans-Photography-Passion-fruit-panna-cotta_backlight-682x1024.jpg" loading="lazy" data-sizes="{"thumbnail":{"height":150,"width":150,"url":"https://lindahermansphotography.com/wp-content/uploads/2022/07/Linda-Hermans-Photography-Passion-fruit-panna-cotta_backlight-150x150.jpg","orientation":"landscape"},"medium":{"height":300,"width":200,"url":"https://lindahermansphotography.com/wp-content/uploads/2022/07/Linda-Hermans-Photography-Passion-fruit-panna-cotta_backlight-200x300.jpg","orientation":"portrait"},"large":{"height":1024,"width":682,"url":"https://lindahermansphotography.com/wp-content/uploads/2022/07/Linda-Hermans-Photography-Passion-fruit-panna-cotta_backlight-682x1024.jpg","orientation":"portrait"},"full":{"url":"https://lindahermansphotography.com/wp-content/uploads/2022/07/Linda-Hermans-Photography-Passion-fruit-panna-cotta_backlight.jpg","height":2000,"width":1333,"orientation":"portrait"}}" data-css="tve-u-182a78d9f76" srcset="https://i0.wp.com/lindahermansphotography.com/wp-content/uploads/2022/07/Linda-Hermans-Photography-Passion-fruit-panna-cotta_backlight.jpg?resize=200%2C300&ssl=1 200w, https://i0.wp.com/lindahermansphotography.com/wp-content/uploads/2022/07/Linda-Hermans-Photography-Passion-fruit-panna-cotta_backlight.jpg?resize=682%2C1024&ssl=1 682w, https://i0.wp.com/lindahermansphotography.com/wp-content/uploads/2022/07/Linda-Hermans-Photography-Passion-fruit-panna-cotta_backlight.jpg?resize=768%2C1152&ssl=1 768w, https://i0.wp.com/lindahermansphotography.com/wp-content/uploads/2022/07/Linda-Hermans-Photography-Passion-fruit-panna-cotta_backlight.jpg?resize=1024%2C1536&ssl=1 1024w, https://i0.wp.com/lindahermansphotography.com/wp-content/uploads/2022/07/Linda-Hermans-Photography-Passion-fruit-panna-cotta_backlight.jpg?w=1333&ssl=1 1333w" sizes="(max-width: 1333px) 100vw, 1333px" />
<img data-lazy-fallback="1" class="tve_image wp-image-4138" alt="London food photographer vegan chocolate mousse" data-id="4138" width="1000" height="1500" title="Linda Hermans Photography-Vegan Chocolate Mousse" src="https://lindahermansphotography.com/wp-content/uploads/2021/08/Linda-Hermans-Photography-Vegan-Chocolate-Mousse-200x300.jpg" data-src="https://lindahermansphotography.com/wp-content/uploads/2021/08/Linda-Hermans-Photography-Vegan-Chocolate-Mousse-683x1024.jpg" loading="lazy" data-sizes="{"thumbnail":{"height":150,"width":150,"url":"https://lindahermansphotography.com/wp-content/uploads/2021/08/Linda-Hermans-Photography-Vegan-Chocolate-Mousse-150x150.jpg","orientation":"landscape"},"medium":{"height":300,"width":200,"url":"https://lindahermansphotography.com/wp-content/uploads/2021/08/Linda-Hermans-Photography-Vegan-Chocolate-Mousse-200x300.jpg","orientation":"portrait"},"large":{"height":1024,"width":683,"url":"https://lindahermansphotography.com/wp-content/uploads/2021/08/Linda-Hermans-Photography-Vegan-Chocolate-Mousse-683x1024.jpg","orientation":"portrait"},"full":{"url":"https://lindahermansphotography.com/wp-content/uploads/2021/08/Linda-Hermans-Photography-Vegan-Chocolate-Mousse.jpg","height":1500,"width":1000,"orientation":"portrait"}}" data-css="tve-u-182a78d9f77" srcset="https://i0.wp.com/lindahermansphotography.com/wp-content/uploads/2021/08/Linda-Hermans-Photography-Vegan-Chocolate-Mousse.jpg?resize=200%2C300&ssl=1 200w, https://i0.wp.com/lindahermansphotography.com/wp-content/uploads/2021/08/Linda-Hermans-Photography-Vegan-Chocolate-Mousse.jpg?resize=683%2C1024&ssl=1 683w, https://i0.wp.com/lindahermansphotography.com/wp-content/uploads/2021/08/Linda-Hermans-Photography-Vegan-Chocolate-Mousse.jpg?resize=768%2C1152&ssl=1 768w, https://i0.wp.com/lindahermansphotography.com/wp-content/uploads/2021/08/Linda-Hermans-Photography-Vegan-Chocolate-Mousse.jpg?resize=750%2C1125&ssl=1 750w, https://i0.wp.com/lindahermansphotography.com/wp-content/uploads/2021/08/Linda-Hermans-Photography-Vegan-Chocolate-Mousse.jpg?resize=360%2C540&ssl=1 360w, https://i0.wp.com/lindahermansphotography.com/wp-content/uploads/2021/08/Linda-Hermans-Photography-Vegan-Chocolate-Mousse.jpg?w=1000&ssl=1 1000w" sizes="(max-width: 1000px) 100vw, 1000px" />
Techniques to enhance the light and airy style In addition to the tools we've talked about so far, there are some other ways of enhancing this bright photography style. Let's look at a couple of composition tricks that you can try.
Negative space Negative space is a composition technique where you intentionally leave an area of your frame "empty" or without props.
This gives the image a lighter feel to it since there are fewer items for the viewer to look at and less visual weight taking up all the available space. The negative space is like breathing space for your eyes and creates this lovely airy atmosphere.
<img data-lazy-fallback="1" class="tve_image wp-image-5492" alt="" data-id="5492" width="1334" height="2000" title="Linda Hermans Photography-Food Photography-Roasted aubergine" src="https://lindahermansphotography.com/wp-content/uploads/2022/07/Linda-Hermans-Photography-Food-Photography-Roasted-aubergine-683x1024.jpg" data-src="https://lindahermansphotography.com/wp-content/uploads/2022/07/Linda-Hermans-Photography-Food-Photography-Roasted-aubergine-683x1024.jpg" loading="lazy" data-sizes="{"thumbnail":{"height":150,"width":150,"url":"https://lindahermansphotography.com/wp-content/uploads/2022/07/Linda-Hermans-Photography-Food-Photography-Roasted-aubergine-150x150.jpg","orientation":"landscape"},"medium":{"height":300,"width":200,"url":"https://lindahermansphotography.com/wp-content/uploads/2022/07/Linda-Hermans-Photography-Food-Photography-Roasted-aubergine-200x300.jpg","orientation":"portrait"},"large":{"height":1024,"width":683,"url":"https://lindahermansphotography.com/wp-content/uploads/2022/07/Linda-Hermans-Photography-Food-Photography-Roasted-aubergine-683x1024.jpg","orientation":"portrait"},"full":{"url":"https://lindahermansphotography.com/wp-content/uploads/2022/07/Linda-Hermans-Photography-Food-Photography-Roasted-aubergine.jpg","height":2000,"width":1334,"orientation":"portrait"}}" data-css="tve-u-182a790205f" srcset="https://i0.wp.com/lindahermansphotography.com/wp-content/uploads/2022/07/Linda-Hermans-Photography-Food-Photography-Roasted-aubergine.jpg?resize=683%2C1024&ssl=1 683w, https://i0.wp.com/lindahermansphotography.com/wp-content/uploads/2022/07/Linda-Hermans-Photography-Food-Photography-Roasted-aubergine.jpg?resize=200%2C300&ssl=1 200w, https://i0.wp.com/lindahermansphotography.com/wp-content/uploads/2022/07/Linda-Hermans-Photography-Food-Photography-Roasted-aubergine.jpg?resize=768%2C1151&ssl=1 768w, https://i0.wp.com/lindahermansphotography.com/wp-content/uploads/2022/07/Linda-Hermans-Photography-Food-Photography-Roasted-aubergine.jpg?resize=1025%2C1536&ssl=1 1025w, https://i0.wp.com/lindahermansphotography.com/wp-content/uploads/2022/07/Linda-Hermans-Photography-Food-Photography-Roasted-aubergine.jpg?w=1334&ssl=1 1334w" sizes="(max-width: 1334px) 100vw, 1334px" />
<img data-lazy-fallback="1" class="tve_image wp-image-4700" alt="" data-id="4700" width="1000" height="1500" title="Linda-Hermans-Photography-Antipasti-23-copy" src="https://lindahermansphotography.com/wp-content/uploads/2022/02/Linda-Hermans-Photography-Antipasti-23-copy-683x1024.jpg" data-src="https://lindahermansphotography.com/wp-content/uploads/2022/02/Linda-Hermans-Photography-Antipasti-23-copy-683x1024.jpg" loading="lazy" data-sizes="{"thumbnail":{"height":150,"width":150,"url":"https://lindahermansphotography.com/wp-content/uploads/2022/02/Linda-Hermans-Photography-Antipasti-23-copy-150x150.jpg","orientation":"landscape"},"medium":{"height":300,"width":200,"url":"https://lindahermansphotography.com/wp-content/uploads/2022/02/Linda-Hermans-Photography-Antipasti-23-copy-200x300.jpg","orientation":"portrait"},"large":{"height":1024,"width":683,"url":"https://lindahermansphotography.com/wp-content/uploads/2022/02/Linda-Hermans-Photography-Antipasti-23-copy-683x1024.jpg","orientation":"portrait"},"full":{"url":"https://lindahermansphotography.com/wp-content/uploads/2022/02/Linda-Hermans-Photography-Antipasti-23-copy.jpg","height":1500,"width":1000,"orientation":"portrait"}}" data-css="tve-u-182a7902063" srcset="https://i0.wp.com/lindahermansphotography.com/wp-content/uploads/2022/02/Linda-Hermans-Photography-Antipasti-23-copy.jpg?resize=683%2C1024&ssl=1 683w, https://i0.wp.com/lindahermansphotography.com/wp-content/uploads/2022/02/Linda-Hermans-Photography-Antipasti-23-copy.jpg?resize=200%2C300&ssl=1 200w, https://i0.wp.com/lindahermansphotography.com/wp-content/uploads/2022/02/Linda-Hermans-Photography-Antipasti-23-copy.jpg?resize=768%2C1152&ssl=1 768w, https://i0.wp.com/lindahermansphotography.com/wp-content/uploads/2022/02/Linda-Hermans-Photography-Antipasti-23-copy.jpg?resize=750%2C1125&ssl=1 750w, https://i0.wp.com/lindahermansphotography.com/wp-content/uploads/2022/02/Linda-Hermans-Photography-Antipasti-23-copy.jpg?resize=360%2C540&ssl=1 360w, https://i0.wp.com/lindahermansphotography.com/wp-content/uploads/2022/02/Linda-Hermans-Photography-Antipasti-23-copy.jpg?w=1000&ssl=1 1000w" sizes="(max-width: 1000px) 100vw, 1000px" />
<img data-lazy-fallback="1" class="tve_image wp-image-5501" alt="" data-id="5501" width="1334" height="2000" title="Linda Hermans Photography-Food Photography-Veggie Spaghetti Bolognese" src="https://lindahermansphotography.com/wp-content/uploads/2022/07/Linda-Hermans-Photography-Food-Photography-Veggie-Spaghetti-Bolognese-683x1024.jpg" data-src="https://lindahermansphotography.com/wp-content/uploads/2022/07/Linda-Hermans-Photography-Food-Photography-Veggie-Spaghetti-Bolognese-683x1024.jpg" loading="lazy" data-sizes="{"thumbnail":{"height":150,"width":150,"url":"https://lindahermansphotography.com/wp-content/uploads/2022/07/Linda-Hermans-Photography-Food-Photography-Veggie-Spaghetti-Bolognese-150x150.jpg","orientation":"landscape"},"medium":{"height":300,"width":200,"url":"https://lindahermansphotography.com/wp-content/uploads/2022/07/Linda-Hermans-Photography-Food-Photography-Veggie-Spaghetti-Bolognese-200x300.jpg","orientation":"portrait"},"large":{"height":1024,"width":683,"url":"https://lindahermansphotography.com/wp-content/uploads/2022/07/Linda-Hermans-Photography-Food-Photography-Veggie-Spaghetti-Bolognese-683x1024.jpg","orientation":"portrait"},"full":{"url":"https://lindahermansphotography.com/wp-content/uploads/2022/07/Linda-Hermans-Photography-Food-Photography-Veggie-Spaghetti-Bolognese.jpg","height":2000,"width":1334,"orientation":"portrait"}}" data-css="tve-u-182a7902076" srcset="https://i0.wp.com/lindahermansphotography.com/wp-content/uploads/2022/07/Linda-Hermans-Photography-Food-Photography-Veggie-Spaghetti-Bolognese.jpg?resize=683%2C1024&ssl=1 683w, https://i0.wp.com/lindahermansphotography.com/wp-content/uploads/2022/07/Linda-Hermans-Photography-Food-Photography-Veggie-Spaghetti-Bolognese.jpg?resize=200%2C300&ssl=1 200w, https://i0.wp.com/lindahermansphotography.com/wp-content/uploads/2022/07/Linda-Hermans-Photography-Food-Photography-Veggie-Spaghetti-Bolognese.jpg?resize=768%2C1151&ssl=1 768w, https://i0.wp.com/lindahermansphotography.com/wp-content/uploads/2022/07/Linda-Hermans-Photography-Food-Photography-Veggie-Spaghetti-Bolognese.jpg?resize=1025%2C1536&ssl=1 1025w, https://i0.wp.com/lindahermansphotography.com/wp-content/uploads/2022/07/Linda-Hermans-Photography-Food-Photography-Veggie-Spaghetti-Bolognese.jpg?w=1334&ssl=1 1334w" sizes="(max-width: 1334px) 100vw, 1334px" />
Bokeh effect The bokeh effect is when the elements in front or behind your main subject are intentionally out of focus and "blurry".
Using this technique can create a really nice dreamy effect in your images and I think it works beautifully in light and airy food photography. For example, when items like flowers and plants are blurred in the foreground it can feel to the viewer as if they're catching a glimpse of a secret scene.
Of course, the bokeh effect can also be used in many other styles too, but there's just something a bit magical about it for bright photos.
Watch this video to learn how to create the bokeh effect
<img data-lazy-fallback="1" class="tve_image wp-image-5497" alt="" data-id="5497" width="1334" height="2000" title="Linda Hermans Photography-Food Photography-Tea story-3" src="https://lindahermansphotography.com/wp-content/uploads/2022/07/Linda-Hermans-Photography-Food-Photography-Tea-story-3-200x300.jpg" data-src="https://lindahermansphotography.com/wp-content/uploads/2022/07/Linda-Hermans-Photography-Food-Photography-Tea-story-3-683x1024.jpg" loading="lazy" data-sizes="{"thumbnail":{"height":150,"width":150,"url":"https://lindahermansphotography.com/wp-content/uploads/2022/07/Linda-Hermans-Photography-Food-Photography-Tea-story-3-150x150.jpg","orientation":"landscape"},"medium":{"height":300,"width":200,"url":"https://lindahermansphotography.com/wp-content/uploads/2022/07/Linda-Hermans-Photography-Food-Photography-Tea-story-3-200x300.jpg","orientation":"portrait"},"large":{"height":1024,"width":683,"url":"https://lindahermansphotography.com/wp-content/uploads/2022/07/Linda-Hermans-Photography-Food-Photography-Tea-story-3-683x1024.jpg","orientation":"portrait"},"full":{"url":"https://lindahermansphotography.com/wp-content/uploads/2022/07/Linda-Hermans-Photography-Food-Photography-Tea-story-3.jpg","height":2000,"width":1334,"orientation":"portrait"}}" data-css="tve-u-182a792eee8" srcset="https://i0.wp.com/lindahermansphotography.com/wp-content/uploads/2022/07/Linda-Hermans-Photography-Food-Photography-Tea-story-3.jpg?resize=200%2C300&ssl=1 200w, https://i0.wp.com/lindahermansphotography.com/wp-content/uploads/2022/07/Linda-Hermans-Photography-Food-Photography-Tea-story-3.jpg?resize=683%2C1024&ssl=1 683w, https://i0.wp.com/lindahermansphotography.com/wp-content/uploads/2022/07/Linda-Hermans-Photography-Food-Photography-Tea-story-3.jpg?resize=768%2C1151&ssl=1 768w, https://i0.wp.com/lindahermansphotography.com/wp-content/uploads/2022/07/Linda-Hermans-Photography-Food-Photography-Tea-story-3.jpg?resize=1025%2C1536&ssl=1 1025w, https://i0.wp.com/lindahermansphotography.com/wp-content/uploads/2022/07/Linda-Hermans-Photography-Food-Photography-Tea-story-3.jpg?w=1334&ssl=1 1334w" sizes="(max-width: 1334px) 100vw, 1334px" />
<img data-lazy-fallback="1" class="tve_image wp-image-5582" alt="" data-id="5582" width="1707" height="2560" title="Linda Hermans Photography-strawberries-1" src="https://lindahermansphotography.com/wp-content/uploads/2020/03/Linda-Hermans-Photography-strawberries-1-200x300.jpg" data-src="https://lindahermansphotography.com/wp-content/uploads/2020/03/Linda-Hermans-Photography-strawberries-1-683x1024.jpg" loading="lazy" data-sizes="{"thumbnail":{"height":150,"width":150,"url":"https://lindahermansphotography.com/wp-content/uploads/2020/03/Linda-Hermans-Photography-strawberries-1-150x150.jpg","orientation":"landscape"},"medium":{"height":300,"width":200,"url":"https://lindahermansphotography.com/wp-content/uploads/2020/03/Linda-Hermans-Photography-strawberries-1-200x300.jpg","orientation":"portrait"},"large":{"height":1024,"width":683,"url":"https://lindahermansphotography.com/wp-content/uploads/2020/03/Linda-Hermans-Photography-strawberries-1-683x1024.jpg","orientation":"portrait"},"full":{"url":"https://lindahermansphotography.com/wp-content/uploads/2020/03/Linda-Hermans-Photography-strawberries-1-scaled.jpg","height":2560,"width":1707,"orientation":"portrait"}}" data-css="tve-u-182a792eeec" srcset="https://i0.wp.com/lindahermansphotography.com/wp-content/uploads/2020/03/Linda-Hermans-Photography-strawberries-1-scaled.jpg?resize=200%2C300&ssl=1 200w, https://i0.wp.com/lindahermansphotography.com/wp-content/uploads/2020/03/Linda-Hermans-Photography-strawberries-1-scaled.jpg?resize=683%2C1024&ssl=1 683w, https://i0.wp.com/lindahermansphotography.com/wp-content/uploads/2020/03/Linda-Hermans-Photography-strawberries-1-scaled.jpg?resize=768%2C1152&ssl=1 768w, https://i0.wp.com/lindahermansphotography.com/wp-content/uploads/2020/03/Linda-Hermans-Photography-strawberries-1-scaled.jpg?resize=1024%2C1536&ssl=1 1024w, https://i0.wp.com/lindahermansphotography.com/wp-content/uploads/2020/03/Linda-Hermans-Photography-strawberries-1-scaled.jpg?resize=1365%2C2048&ssl=1 1365w, https://i0.wp.com/lindahermansphotography.com/wp-content/uploads/2020/03/Linda-Hermans-Photography-strawberries-1-scaled.jpg?w=1707&ssl=1 1707w" sizes="(max-width: 1707px) 100vw, 1707px" />
<img data-lazy-fallback="1" class="tve_image wp-image-3815" alt="how to execute a successful food photoshoot" data-id="3815" width="1707" height="2560" title="Lemonade-violets-food-photography-1" src="https://lindahermansphotography.com/wp-content/uploads/2021/06/Lemonade-violets-food-photography-1-200x300.jpg" data-src="https://lindahermansphotography.com/wp-content/uploads/2021/06/Lemonade-violets-food-photography-1-683x1024.jpg" loading="lazy" data-sizes="{"thumbnail":{"height":150,"width":150,"url":"https://lindahermansphotography.com/wp-content/uploads/2021/06/Lemonade-violets-food-photography-1-150x150.jpg","orientation":"landscape"},"medium":{"height":300,"width":200,"url":"https://lindahermansphotography.com/wp-content/uploads/2021/06/Lemonade-violets-food-photography-1-200x300.jpg","orientation":"portrait"},"large":{"height":1024,"width":683,"url":"https://lindahermansphotography.com/wp-content/uploads/2021/06/Lemonade-violets-food-photography-1-683x1024.jpg","orientation":"portrait"},"full":{"url":"https://lindahermansphotography.com/wp-content/uploads/2021/06/Lemonade-violets-food-photography-1-scaled.jpg","height":2560,"width":1707,"orientation":"portrait"}}" data-css="tve-u-182a792eefd" srcset="https://i0.wp.com/lindahermansphotography.com/wp-content/uploads/2021/06/Lemonade-violets-food-photography-1-scaled.jpg?resize=200%2C300&ssl=1 200w, https://i0.wp.com/lindahermansphotography.com/wp-content/uploads/2021/06/Lemonade-violets-food-photography-1-scaled.jpg?resize=683%2C1024&ssl=1 683w, https://i0.wp.com/lindahermansphotography.com/wp-content/uploads/2021/06/Lemonade-violets-food-photography-1-scaled.jpg?resize=768%2C1152&ssl=1 768w, https://i0.wp.com/lindahermansphotography.com/wp-content/uploads/2021/06/Lemonade-violets-food-photography-1-scaled.jpg?resize=1024%2C1536&ssl=1 1024w, https://i0.wp.com/lindahermansphotography.com/wp-content/uploads/2021/06/Lemonade-violets-food-photography-1-scaled.jpg?resize=1365%2C2048&ssl=1 1365w, https://i0.wp.com/lindahermansphotography.com/wp-content/uploads/2021/06/Lemonade-violets-food-photography-1-scaled.jpg?resize=750%2C1125&ssl=1 750w, https://i0.wp.com/lindahermansphotography.com/wp-content/uploads/2021/06/Lemonade-violets-food-photography-1-scaled.jpg?resize=360%2C540&ssl=1 360w, https://i0.wp.com/lindahermansphotography.com/wp-content/uploads/2021/06/Lemonade-violets-food-photography-1-scaled.jpg?resize=720%2C1080&ssl=1 720w, https://i0.wp.com/lindahermansphotography.com/wp-content/uploads/2021/06/Lemonade-violets-food-photography-1-scaled.jpg?w=1707&ssl=1 1707w" sizes="(max-width: 1707px) 100vw, 1707px" />
<img data-lazy-fallback="1" class="tve_image wp-image-5499" alt="" data-id="5499" width="1334" height="2000" title="Linda Hermans Photography-Food Photography-Vegan chocolate mousse" src="https://lindahermansphotography.com/wp-content/uploads/2022/07/Linda-Hermans-Photography-Food-Photography-Vegan-chocolate-mousse-200x300.jpg" data-src="https://lindahermansphotography.com/wp-content/uploads/2022/07/Linda-Hermans-Photography-Food-Photography-Vegan-chocolate-mousse-683x1024.jpg" loading="lazy" data-sizes="{"thumbnail":{"height":150,"width":150,"url":"https://lindahermansphotography.com/wp-content/uploads/2022/07/Linda-Hermans-Photography-Food-Photography-Vegan-chocolate-mousse-150x150.jpg","orientation":"landscape"},"medium":{"height":300,"width":200,"url":"https://lindahermansphotography.com/wp-content/uploads/2022/07/Linda-Hermans-Photography-Food-Photography-Vegan-chocolate-mousse-200x300.jpg","orientation":"portrait"},"large":{"height":1024,"width":683,"url":"https://lindahermansphotography.com/wp-content/uploads/2022/07/Linda-Hermans-Photography-Food-Photography-Vegan-chocolate-mousse-683x1024.jpg","orientation":"portrait"},"full":{"url":"https://lindahermansphotography.com/wp-content/uploads/2022/07/Linda-Hermans-Photography-Food-Photography-Vegan-chocolate-mousse.jpg","height":2000,"width":1334,"orientation":"portrait"}}" data-css="tve-u-182a792eeff" srcset="https://i0.wp.com/lindahermansphotography.com/wp-content/uploads/2022/07/Linda-Hermans-Photography-Food-Photography-Vegan-chocolate-mousse.jpg?resize=200%2C300&ssl=1 200w, https://i0.wp.com/lindahermansphotography.com/wp-content/uploads/2022/07/Linda-Hermans-Photography-Food-Photography-Vegan-chocolate-mousse.jpg?resize=683%2C1024&ssl=1 683w, https://i0.wp.com/lindahermansphotography.com/wp-content/uploads/2022/07/Linda-Hermans-Photography-Food-Photography-Vegan-chocolate-mousse.jpg?resize=768%2C1151&ssl=1 768w, https://i0.wp.com/lindahermansphotography.com/wp-content/uploads/2022/07/Linda-Hermans-Photography-Food-Photography-Vegan-chocolate-mousse.jpg?resize=1025%2C1536&ssl=1 1025w, https://i0.wp.com/lindahermansphotography.com/wp-content/uploads/2022/07/Linda-Hermans-Photography-Food-Photography-Vegan-chocolate-mousse.jpg?w=1334&ssl=1 1334w" sizes="(max-width: 1334px) 100vw, 1334px" />
Summary That wraps up this blog post about creating light and airy food photography!
We covered some of the basic tools you can use to help you create this style, such as a tripod , light diffusers and bounce boards and of course the props and backdrops in the general scene. Then we looked at two creative composition techniques you can try to enhance the bright style: negative space and the bokeh effect . I hope this post was helpful and that you now feel inspired to create some fresh images yourself!
<img data-lazy-fallback="1" class="tve_image wp-image-5682" alt="" data-id="5682" width="800" height="1200" title="light and airy1" src="https://lindahermansphotography.com/wp-content/uploads/2022/08/light-and-airy1-683x1024.jpg" data-src="https://lindahermansphotography.com/wp-content/uploads/2022/08/light-and-airy1-683x1024.jpg" loading="lazy" data-sizes="{"thumbnail":{"height":150,"width":150,"url":"https://lindahermansphotography.com/wp-content/uploads/2022/08/light-and-airy1-150x150.jpg","orientation":"landscape"},"medium":{"height":300,"width":200,"url":"https://lindahermansphotography.com/wp-content/uploads/2022/08/light-and-airy1-200x300.jpg","orientation":"portrait"},"large":{"height":1024,"width":683,"url":"https://lindahermansphotography.com/wp-content/uploads/2022/08/light-and-airy1-683x1024.jpg","orientation":"portrait"},"full":{"url":"https://lindahermansphotography.com/wp-content/uploads/2022/08/light-and-airy1.jpg","height":1200,"width":800,"orientation":"portrait"}}" data-css="tve-u-182a7973cc7" srcset="https://i0.wp.com/lindahermansphotography.com/wp-content/uploads/2022/08/light-and-airy1.jpg?resize=683%2C1024&ssl=1 683w, https://i0.wp.com/lindahermansphotography.com/wp-content/uploads/2022/08/light-and-airy1.jpg?resize=200%2C300&ssl=1 200w, https://i0.wp.com/lindahermansphotography.com/wp-content/uploads/2022/08/light-and-airy1.jpg?resize=768%2C1152&ssl=1 768w, https://i0.wp.com/lindahermansphotography.com/wp-content/uploads/2022/08/light-and-airy1.jpg?w=800&ssl=1 800w" sizes="(max-width: 800px) 100vw, 800px" />
<img data-lazy-fallback="1" class="tve_image wp-image-5683" alt="" data-id="5683" width="800" height="1200" title="light and airy2" src="https://lindahermansphotography.com/wp-content/uploads/2022/08/light-and-airy2-683x1024.jpg" data-src="https://lindahermansphotography.com/wp-content/uploads/2022/08/light-and-airy2-683x1024.jpg" loading="lazy" data-sizes="{"thumbnail":{"height":150,"width":150,"url":"https://lindahermansphotography.com/wp-content/uploads/2022/08/light-and-airy2-150x150.jpg","orientation":"landscape"},"medium":{"height":300,"width":200,"url":"https://lindahermansphotography.com/wp-content/uploads/2022/08/light-and-airy2-200x300.jpg","orientation":"portrait"},"large":{"height":1024,"width":683,"url":"https://lindahermansphotography.com/wp-content/uploads/2022/08/light-and-airy2-683x1024.jpg","orientation":"portrait"},"full":{"url":"https://lindahermansphotography.com/wp-content/uploads/2022/08/light-and-airy2.jpg","height":1200,"width":800,"orientation":"portrait"}}" data-css="tve-u-182a7973ccb" srcset="https://i0.wp.com/lindahermansphotography.com/wp-content/uploads/2022/08/light-and-airy2.jpg?resize=683%2C1024&ssl=1 683w, https://i0.wp.com/lindahermansphotography.com/wp-content/uploads/2022/08/light-and-airy2.jpg?resize=200%2C300&ssl=1 200w, https://i0.wp.com/lindahermansphotography.com/wp-content/uploads/2022/08/light-and-airy2.jpg?resize=768%2C1152&ssl=1 768w, https://i0.wp.com/lindahermansphotography.com/wp-content/uploads/2022/08/light-and-airy2.jpg?w=800&ssl=1 800w" sizes="(max-width: 800px) 100vw, 800px" />


0 comments